FREQUENTLY ASKED QUESTIONS
Below is an FAQ that answers a majority of the common questions we receive. Please give it a read prior to sending us an E-Mail – it may save you some time! If you still have questions, please use the form located at https://killer-innovations.com/contact/ to contact us and we will get back to you as soon as possible!
QUICK LINKS
Barrels
I Just Installed Your Barrel/Slide and It Is Sticking/Won’t Rack/Hangs Up – What Should I Do?
- Do not worry, we have some ideas to help! Please check out this video on breaking in our barrels and slides:
- Our barrels and slides are plated with an extremely hard finish that uses the PVD coating process. These finishes, when new, can be micro abrasive and require a break in period to burnish the finish into other metal contact areas. We suggest using grease lubrication on all metal-to-metal contact areas on the barrel and slide to help this burnishing process along.
- Killer Innovations recommends using Lucas Red n Tacky #2 Grease during break in.
- We do not recommend you run our compensator until this break in has been done. It will usually take 300 to 400 rounds to completely break in.
- During this break-in period, you will get misfeeds and failures to feed. This is normal and should stop once your barrel is fully broken in.
- If issues persist, make sure you are using an OEM connector and safety plunger as some aftermarket parts can add excessive drag and cause feeding issues.
- If you are still having problems, please contact support@killer-innovations.com, or call our office at 844-214-8622 for assistance.
How Much Lubrication Do I Use on My Slide/Barrel?
- Killer Innovations recommends placing a light film of grease lubrication around the OD of the barrel where it protrudes from the muzzle end of the slide, as well as placing a thin coating on the roof and side of the chamber where the barrel contacts the slide.
- Killer Innovations does not recommend using oil lubrication as this may damage the barrel’s finish.
- For precise lubrication instructions, please see our Glock/CZP10C/Sig P320 slide installation instructions, located here:
- Reapply lubrication after 1000 rds. This is dependent on shooting condition and time between use.
What Ammo Do You Recommend For Your Barrels?
- We recommend a good quality 115 grain ball ammo to get the best performance out of our barrels. We use American Eagle and Herters ammunition to test with in the shop.
- +P Ammo will also work well in our accessories.
- We do not recommend using reloads or non-brass cased lead ammo, as these items can damage your barrel.
What is Single Point Rifiling and why is it the most accurate?
Single process technology
killer innovations has developed what we believe to be the most accurate pistol bore manufacturing process ever created. s.p.t. stands for single process technology and single point technology. single process technology means the bore, rifling, and chamber are cut in one high precision machine without human interference.
What it means…
single point technology means the rifling is cut using the legendary and painstaking single point cutting technique. this single point cut rifling process requires a single cutter to make 120 individual cuts to accurately rifle each bore. single point cutting yields identical grooves that have less than .0001” deviation between each other because they are being cut with the exact same cutter.
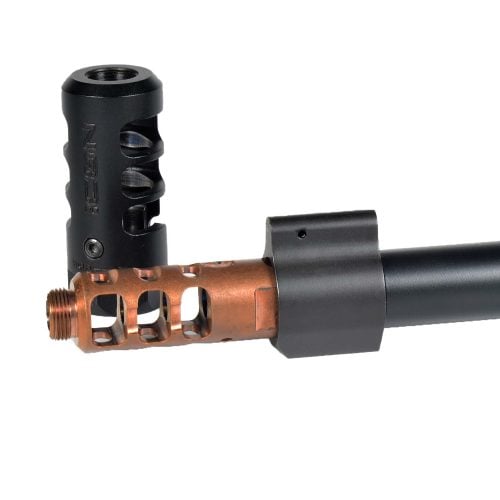
Compensators
I Am Having Compensator Installation Issues- Can You Help?
- Double check that the compensator you purchased is compatible for your model of firearm. Our compensators must match the make, model, and generation of your firearm for successful installation. Please refer to compatibility guides on the specific product pages if you have any questions. Our compensators are designed to work only with the specifically listed firearm makes/models/generations.
- Please watch this video covering common issues that can occur during compensator installation: https://www.youtube.com/watch?v=PBEC00vg3js
- Ensure that the rubber O-Ring and thread protector were removed from your barrel prior to installation. The threads on your barrel need to be right hand ½-28 thread pitch and extend to the end of the barrel.
- Check that the locking ring is tight. Hold the button on the compensator all the way in and turn the threaded ring by hand to check for thread tightness. Ensure there is no “clicking” noise from the ring during this procedure.
- Ensure your guide rod is a match for your firearm and is in good working order. If you are running our compensator on a Glock 19, we recommend changing to a 13 lb spring.
Are Your Compensators Interchangeable? Can I Use A Gen 3 On A Gen 4, Etc? Can I Use It On A Different Model of Firearm Than What Is Listed?
- Our compensators are designed specifically for the stated model and generation of firearm. The dimensions and guide rod requirements differ from generation to generation and model to model, and as such our compensators cannot be used interchangeably. Please ensure you purchase the correct model and generation to match your firearm needs.
What Allen Wrenches Do I Need For My Compensator?
- For the Socket Cap screw on the bottom: 7/64 Allen Wrench
- For the set screws: 5/64 Allen Wrench
The Button on My Compensator Is Stuck – What Do I Do?
- It sounds as if a little too much thread locker was used during installation. Firstly, remove the screw from the bottom of the compensator. Pry it out gently, then clean the thread locker residue from the parts and hole with some alcohol and a Q tip. Use a small amount of blue thread locker when reinstalling the screw (too much will glue the button in place once it dries). Tighten the screw until the button will not move, then back off on the screw until the button moves freely.
The Compensator Locking Ring Is Stuck On My Barrel With Thread Locker – What Can I Do?
- Please make sure the gun is unloaded and safe before starting this procedure. If possible, have someone help you by holding the gun firmly during this process.
- If available, use a heat gun to the warm the locking ring.
- Using two narrow strips of duct tape, stick the strips over the locking ring in two layers.
- With a pair of channel lock pliers grab onto the locking ring with the contact points at 3 & 9 o’clock from the top. Make sure to adjust the pliers so the jaws are parallel when grabbing onto the locking ring.
- Push the compensator button all the way in and firmly rotate the locking ring in a counterclockwise direction. Be very careful not to gouge the aluminum compensator body.
- Once the ring has been removed, clean the thread locker residue off the barrel threads and locking ring with lacquer thinner.
My Gun Keeps Jamming After I Installed the Compensator – Help!
- We have a helpful video available that goes over some common issues when running a compensator.
- A compensator is designed to take the gases released from firing ammunition and redirect them in a way that is more advantageous to the shooter – resulting in flatter shooting and faster follow up. However, the compensator robs momentum from the slide action during this procedure. Always be sure to run high quality ammunition to ensure enough cycling power on your firearm with compensation.
- We recommend using American Eagle 115 grain ball, or Herters Ammunition.
- Ensure your barrel and slide are fully broken in before attempting to run a compensator.
- If you are still having issues, please contact support@killer-innovations.com, or call our office at 844-214-8622 for assistance.
What is the best way to clean my compensator?
- The simplest method to clean our compensators is to disassemble them, and clean with gun solvent and picks/brushes.
- We also recommend ultrasonic cleaning.
What is the difference between the two locking rings included with my compensator?
- We include two different locking rings with your compensator to allow you to tailor your shooting experience to your needs.
- Full Compensation: the smaller or thinner ring will yield full compensation to your firearm. This means you will experience less recoil and muzzle rise and help give you more accurate and faster follow-up shots. However, this can also mean your firearm may be a bit more temperamental. It will need to be cleaned regularly, used with good quality ammo, and patience will be needed during break in.
- Reduced Compensation: the larger or thicker ring will do much the same job as the smaller ring, just to a lesser extent. Also, with the reduced compensation ring in place your firearm will be less temperamental – it will run more consistently with some neglect or poorer ammo. However, it won’t be as effective at reducing recoil and muzzle rise.
Holsters
I Am Looking at Holsters-What Is The Overall Measurement Of A Glock 19 With Your Compensator?
- The overall measurement of a Glock 19 Gen 3-4 from the back of the slide to the front of the compensator is 8.19”. For a Gen 5 it is 8.23”.
Do Safariland Holsters Work With Your Compensator?
- Safariland Holsters will work with our compensator set up; however, they will need to be modified by cutting off the end and removing the spring from the retaining latch.
What Holsters Do You Recommend To Work With Your Compensators?
- Killer Innovations recommend holsters with the “infinity” cut – i.e., open bottoms to work the best with our compensators.
- Killer Innovations also offers our own specially designed holster made to work with our products.
Do your Holsters work with flashlights?
- Unfortunately, none of the holsters Killer Innovations offers are set up to work with flashlights or light bearing. We recommend contacting a holster-specific company for this particular function.
Magwells
I Am Having An Issue Installing Killer Innovations’ Magwell – Do You Have Any Tips?
- Double check that the Magwell you purchased is compatible with your model of firearm. Some aftermarket items (such as Poly 80 frames) may need modification to allow the Magwell to snap in place.
- If your firearm has been stippled or cerakoted, it is possible some extra material may be binding up the Magwell. Double check that there is nothing preventing the Magwell from sliding on.
- Heat from cerakoting can also cause your grip to expand and the magwell to not fit properly.
I Am Not Sure Which Glock Magwell Plug To Use With My Firearm.
- Killer Innovations Glock 17 and 19 Magwells come with 2-3 Magwell Plugs.
- Magwell packages containing 3 magwell plugs are designed to work with Gen 1-3, Gen 4 w/ Backstrap, and Gen 4 w/out a Backstrap.
- Magwell packages containing 3 magwell plugs are designed to work with Gen 1-3, Gen 4 w/ Backstrap, and Gen 4 w/out a Backstrap.
What Allen Wrenches Do I Need For Killer Innovations Magwells?
- Glock Magwells
- 3/32 and 5/64 Allen Wrenches
- CZP10C Magwells
- T8 wrench
- Sig P320C Magwells
- 1/16 Allen Wrench
Magazine Extensions
I Am Having An Issue Installing Killer Innovations’ Magazine Extension – Do You Have Any Tips?
- Double check that the magazine extension you purchased is compatible with your model of firearm. Please note that Killer Innovations magazine extensions will not work with 10 round magazines, magpul, or ETS.
- Please Read through our handy installation instructions.
- Glock https://killer-innovations.com/wp-content/uploads/2021/06/KI-GLOCK-MAG-EXTENSION-INSTRUCTIONS-06-02-21.pdf
- CZ https://killer-innovations.com/wp-content/uploads/2021/06/KI-CZ-P10-MAG-EXTENSION-INSTRUCTIONS-06-02-21.pdf
- Sig https://killer-innovations.com/wp-content/uploads/2021/06/KI-SIG-P320-MAG-EXTENSION-INSTRUCTIONS.pdf
- Check out this video detailing installation instructions. The magazine extension section starts at 3:27
- CZP10 and Sig P320C magazine extensions are designed with a set screw on the top that will need to be backed out and then tightened to clamp to install your extension properly.
What Size Allen Wrenches Do I Need for My Magazine Extensions?
- For Glock Magazine Extensions
- Set Screw: 5/64 Allen Wrench
- Cap Screw: 3/32 Allen Wrench
- For CZP10 and Sig P320 magazine extensions
- Set Screw: 5/64 Allen Wrench
- Cup Point Screw: 1/16 Allen Wrench
The Glock Magazine Extensions Come With Springs. Why Don’t the CZ and Sig Magazine Extensions Include Springs?
- Our CZP10 and Sig P320 magazine extensions were designed specifically to work with existing magazine springs, and as such do not include replacement springs with purchase.
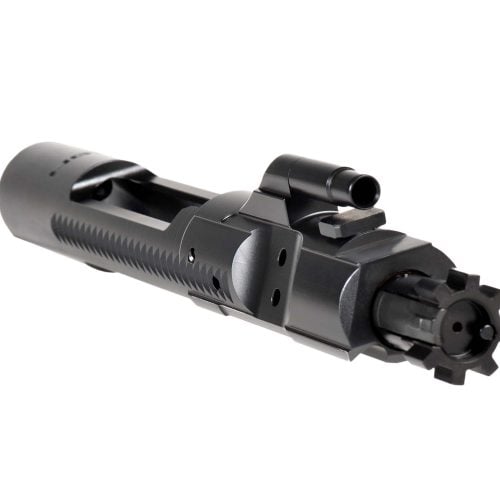
Slides
The Screws That Came With My Trijicon Optic Are Too Long, And The Screws That Came With The Slide Are Too Short For Install – What Do I Do?
- We have great news! We have a Custom RDS Screw kit that is made specifically for our slides. You can find it here – Custom RDS Screws – RMR/Holosun
How Do I Install My RMR Shim?
- The included RMR shim is used to take up the small gap between your optic and the rear of the slide. It serves a purely visual function, and you can run your firearm without it if you choose.
- The shim does not require tools to install. Before installing your optic, place the shim along the rear of the optic cut with the half-round on the shim fitting into the slot just under the rear iron sight dovetail.
- Once the shim is flush against the wall with the half-round tab installed in the tab opening install your optic as normal.
- The shim will fill the gap left if using an optic with the RMR footprint.
Do Killer Innovations Slides Come With A Channel Liner Installed?
- Our Velocity slides are sold stripped, and do not include channel liners.
- We recommend OEM upper parts kits to complete your slide build.
Are Your Slides Compatible with the Radian Ramjet/Afterburner Combo?
- While our slides are designed to pair with OEM Glock parts, Killer Innovations’ Slides do not have the same contoured front as an OEM Glock Slide. Unfortunately, the Radian Ramjet/Afterburner Combo does not work on our slides due to this dimensional difference.
What Sights Do You Recommend Using On Your Slides?
- Our slides are designed to work with Iron Sights, and Red Dot Sights (specifically Trijicon RMR and Leupold Delta Point Pro). Please check out the instructions for each firearm model located here: https://killer-innovations.com/instructions/
- Reference Section 4 for Iron Sights
- Reference Section 5 for Red Dot
- Killer Innovations recommends Night Fision Sights https://www.nightfision.com/
- Installation video can be found here: https://www.youtube.com/watch?v=pcMNUv7Cv_g&t=2s
Can I use a Holosun sights on your slides? What are they compatible with?
- Our slides are compatible with the Holosun 507 series if you are looking for a direct bolt-on option.
- Our slides are also compatible with the 509 series; however, this version has a dovetail style mounting system that will require an adaptor plate. Holosun provides an adaptor plate with the 509 series, and this plate should fit our slide RMR bolt pattern.
Can I use a Holosun EPS Sight on Your Slides?
- The Holosun EPS was designed for sub-compact pistols like the Glock 43X/48 or Sig P365 series. The Holosun EPS has a smaller footprint than the standard Trijicon RMR. The EPS footprint, much like the Holosun 507K and Trijicon RMRCC will require an adaptor plate made by an aftermarket company in order to fit the bolt pattern on our slides.
Can I use a Sig Romeo 1 on your slides?
- Unfortunately, the Sig Romeo 1 sight will not work with our V1 or V2 slides. While the bolt pattern is similar to the Leupold Delta Point Pro Series, the length of the sight is just long enough that it will not fit in our footprint.
Can I use an SRO on your Sig P320 C Slide?
- The Trijicon RMR and the SRO do have the same footprint and will fit our slides. However, we are aware of an issue with the SRO on our slides. Because of how far forward the lens hangs out over the ejection port, it tends to cause stovepipe issues when running with the SRO optic in particular. There are aftermarket adaptor plates available to shift the SRO further back to reduce this issue.
Can I use a Trijicon RMR CC on Your Slides?
- The Trijicon RMRCC has a new bolt pattern different from the standard Trijicon RMR. The RMRCC is a narrower optic designed for subcompact slides such as the Glock 43X or Sig P365. As such, it will not work on our slides without an aftermarket adaptor plate.
Can I use a Trijicon RMR HD on Your Slides?
- Yes, the Trijicon RMR HD will mount to our Optic Cut without an issue.
13lb Spring Kit
How Do I Install the Adaptor Ring For the 13lb Spring Kit?
- Our 13lb Spring kit is recommended for running our compensator on a Glock 19. Included is an adaptor ring to use the 13lb Spring Kit on a Gen 4 firearm. If you have a Gen 3, you will not need to use the adaptor ring.
- The adaptor ring will snap easily into the guide rod hole on the end of your Gen 4 slide.
Customizations/Color Questions
Custom Item Orders/Colors/Cuts – Do You Offer This Service?
- Due to the demands of our own product lines, as well as time, tooling and programming costs, Killer Innovations is not able to offer customized items. All our accessories are made in-house from start to finish – we do not modify existing OEM parts. We are not able to customize personal slides or other items with our designs.
- We would love to offer custom colors or variants on our items, but it is not something we are set up to do at this time.
Can You Tell Me Which Cerakote Colors Will Match Your Accessories?
- Killer Innovations uses a PVD Coating Process for our slides and barrels, and anodizing for our other accessories (magwells, base pads, triggers, magazine extensions, compensators, back plates). As we do not use cerakote, we are not able to suggest appropriate color matches for our items. We recommend talking to a cerakoter in your area for more information.
The Gold Color On Your Accessories Doesn’t Match the Barrel or Comp – Why?
- Due to the differences in the metal composition and finishing processes of our accessories, we cannot guarantee exact color matches between our items. For more information, please see our full explanation located here:
What is the Difference between the Finishing Processes on Your Parts?
- Killer Innovations parts undergo different coating processes depending on the material they are made of.
- Anodizing
- Our compensators and general firearm accessories receive an anodized coating. Anodizing is an electrochemical process that converts the metal surface into a decorative, durable, corrosion-resistant, anodic oxide. This is the finish of choice for 6061 and 7075 Aluminum Parts.
- PVD Coating.
- Our slides and barrels have a tough PVD (physical vapor deposition) coating, also known as thin-film coating. This is a process in which a solid material is vaporized in a vacuum and deposited on the surface of a part. Our 416R Stainless and 17-4 Stainless Steel barrels and slides are coated in this manner.
General Questions
Do Killer Innovations Parts Work On Poly 80 Frames/Builds?
- Killer Innovations parts will work with the Polymer 80 lower kits, however getting everything up and functional may take more time, trial and error and work than a traditional OEM Glock part replacement. Killer Innovations parts and accessories are only guaranteed to work with Killer Innovations parts and OEM Glock Parts. Compatibility with other aftermarket parts is not guaranteed.
- Killer Innovations is not able to troubleshoot every issue that may arise while creating a Polymer 80 build. We recommend researching tips and techniques thoroughly before beginning your build, and if you run into trouble (unrelated to the function of our specific parts), please consult a qualified local gunsmith.
Who Does The Custom Work (Cerakoting/Stipling/Etc) For The Guns On Your Social Media Feed?
- Many of the guns featured on our Instagram and Facebook pages are submitted by our media partners, enthusiasts, and by our valued customers. We love seeing all the creative ways our accessories are used in your personal builds!
- Most of the photos are tagged with the maker or builder who created the custom build, and we encourage you to reach out to them for more information on something that has captured your interest.
What Parts Do You Recommend To Finish My Build?
- We recommend checking out companies such as Rainier Arms (https://www.rainierarms.com/) for a wide variety of both specialized and OEM parts and kits to ensure the best from your builds. Always have your parts inspected and installed by qualified armorers. When in doubt, we recommend OEM parts kits to ensure compatibility.
Will Your Items Work With Every Company’s Products?
- Killer Innovations guarantees our items will work with OEM parts, and with our own accessories. There are just too many variations in design and tolerances between various companies for us to test and verify every item.
- Our individual product pages are kept up to date with known compatibilities. We cannot guarantee compatibility outside of what is stated on these pages.
Website Questions
Can You Ship Internationally?
- Unfortunately, we are not able to export or ship overseas currently. We recommend checking out either our distributor Rainier Arms (www.rainierarms.com) to see if they can ship to your area or the third party exporter Reloading International (www.reloadinginternational.com).
When Will Things Be in Stock?
- We are always working hard to bring our accessories to you in a timely manner. Our website is kept up to date with the latest products in stock and ready to ship today.
- Please be sure to take advantage of the email in-stock alert signup on the individual product pages. This will guarantee you will be notified immediately when that item you have been looking for is available.
When Will My Order Ship?
- Most in-stock orders will ship within 1-2 days. Delays may occur during weekends and holidays, heavy order periods or during significant weather disruptions.
- You will receive a tracking email the same day your order is dispatched.
- Slowdowns have been occurring with the US Postal system intermittently, and some packages can take up to 4 weeks to arrive. If you have questions or need assistance with a delayed package, please contact us at orders@killer-innovations.com.
My Credit Card Was Declined – What Happened?
- We are sorry you are having problems! Your order is likely not processing because of an AVS Mismatch Error regarding the billing information entered.
- When entering your order, the Billing Information must exactly match the address on record with your bank or credit card. Please verify the billing information used on your card statement and try the transaction again making sure the house number and zip code entered match your card records.
- You may see pending charges on your card after a failed order. This is normal, as any attempt to charge puts a temporary pending charge on your card. These pending charges will drop off after a short period of time. These charges will not go through, and do not constitute a successful order.
- Please check your billing information and try your order again. If the billing is correct and the order still will not process, please give our office a call at 844-214-8622 and we can attempt to run your card manually.